Another guest post from Nevil Hunt of Seven Segments of Pi.
Part 7 – “NOOBS to the rescue! …but Mr Hunt – I’ve lost my SD Card!”
Last week I talked about the fun of soldering! This week I will describe some of the technical and practical challenges I faced running a Raspberry Pi Workshop in which pupils were encouraged to carry on writing their software at home. This Blog will be entitled…
”NOOBS to the rescue! …but Mr Hunt – I’ve lost my SD Card!”
The pupils now had their own “Seven Segments of Pi” board…
I was keen that as many pupils as possible bought their own Raspberry Pi so they could carry on programming at home. The lesson from the 1980’s boom in computer programming in the UK was that whilst pupils may have been introduced to programming in the classroom on a BBC Micro…
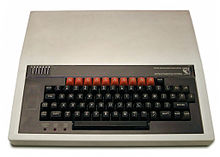
…it was the pupils who had a BBC Micro, ZX-81 or ZX-Spectrum at home allowing them to carry on programming in their bedroom, who excelled! And this is how many of today’s talented programmers in the UK developed their skills! The Raspberry Pi gives us the chance to repeat that success.
I suggested the parents of my pupils buy a Raspberry Pi for their son/daughter. Many parents were bamboozled by the Raspberry Pi! If you are not an enthusiast it’s not clear what to buy! And what you need to buy depends on what you’ve already got! Many households may already have a suitable Micro USB Power Supply, USB Keyboard, USB Mouse and/or PC Speakers that could be used. But like the schools the main confusion was with the monitor! The parents who had heard of the Raspberry Pi assumed it would have to plug into an HDMI TV. Some thought they could plug it into the Composite Video input of an older style TV. (Not a good idea if you want to be able to read the text in your programs!) Most had no idea at all! I therefore wrote a “What to Buy” guide for the parents, explaining the options.
(I will post an updated version of this “What to Buy” guide on my Web Site when I have an HDMI-to-VGA Adapter I can recommend!)
They now needed their own SD Card!
In the Workshops I used the Raspbian SD Card image downloaded from www.raspberrypi.org. This was OK for the Workshops but needed different settings in the “config.txt” file to operate with different monitors. I wanted the pupils to be able to plug their SD Card into the school’s Raspberry Pi’s during the day then take it home and plug it into their own Raspberry Pi at night. Changing the “config.txt” file each time would be a nightmare!
My work colleague who was monitoring the www.raspberrypi.org daily Blog mentioned to me something called “NOOBS” standing for “New Out Of the Box Software”.

The Raspberry Pi foundation had recognised this very problem and NOOBS was their solution! I downloaded the “NOOBS” image and tried it out. It worked with my DVI Monitor. It worked with my VGA Monitor. It also worked with my HDMI TV (although the text was a bit small!). But the main thing was that it worked with all three types of monitor without having to modify the “config.txt” file!
NOOBS had come to my rescue!
I spent the weekend loading the Seven Segments of Pi files onto my NOOBS SD Card then copied it onto a couple of dozen blank SD Cards to give out to the pupils.
But looking at the SD Cards, they were quite small! If I gave them out this week I wondered, would I return next week to hear…
“Mr Hunt – I’ve lost my SD Card!”
I envisioned them in pupil’s pockets only to disappear when they took their handkerchief out to blow their nose! And that would be end not only of their SD Card, but of the software they had written too!
I searched the internet for a solution! And found these SD Card Key Rings…and small Climbing Clips…
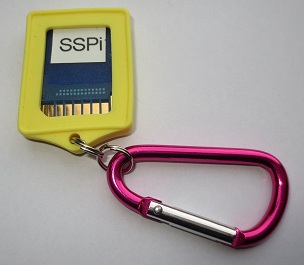
With an SD Card Key Ring** they could insert their SD Card in their Key Ring at the end of the lesson and use the Climbing Clip to attach it to their belt hooks.
They worked! Over the remaining weeks until the end of term not one pupil lost their SD Card! There was one pupil however who didn’t lose his SD Card, but did manage to lose his SD Card Key Ring!! There is only so much you can do!!!
**The PiHut have just started stocking these SD Card Key Rings & Clips!
http://thepihut.com/products/sd-card-cases-with-carabiner
Since running the workshops I’ve added these ‘extra features’ to the “SSPi” SD Card supplied with the kit to make it easier to use in the classroom:-
a) Custom SSPi NOOBs. The “SSPi” SD Card supplied with the kit is a Custom “Raspbian+SSPi NOOBS” image. This means it not only contains the usual NOOBS Raspbian Operating System and associated files, it also contains the Seven Segments of Pi files and the extra features below. But the advantage of it being a “Custom NOOBS” image is that once a pupil has completed the challenge the SD Card can be easily “reset” ready for the next pupil by holding the “shift” key down as the Raspberry Pi boots and following the on-screen instructions. Warning – This will delete all the software written by the previous pupil!!!
b) Seven Segments of Pi Instructions Manual on “SSPi” SD Card. As well as being available to download from the Web Site, the PDF of the Instructions Manual is included on the SD Card so it is always readily available for reference. I recommend having printed instruction manuals available for the pupils and I plan to make printed manuals available as an optional extra when buying the kit.
c) Short Cuts on Desktop. A short cut to the Instruction Manual and IDLE (the Python Editor) are provided as icons in the centre of the home screen. The Raspberry Pi has two Python Editors, IDLE and IDLE3. The Seven Segments of Pi software is written for the IDLE editor and will give syntax errors if it is run using IDLE3. The desktop shortcut help ensure pupils run the correct editor.
d) Customised Web Browser. With a ‘standard’ NOOBS SD Card “Midori” (the Web Browser) comes configured when running the GUI using “startx” but is not properly configured when running the GUI using “sudo startx”. Since to drive the GPIO for the Seven Segments of Pi it must be run as “sudo startx” I have configured “Midori” including shortcuts to useful Web Sites.
e) Remote Login. Getting files on and off the Raspberry Pi can be difficult! It can be done with a USB Memory Stick as described on Page 31 of the Manual. A better way, also described on this page is to connect the Raspberry Pi to your network via an Ethernet Cable. The SSPi SD Card has Remote Login ‘enabled’ to allow the transfer of files between the Raspberry Pi and a Windows PC. This can be used for instance to load new sound effect files onto the Raspberry Pi or more importantly to allow the teacher to take back-up copies of the pupil’s work at the end of each lesson! All SD Cards will have the same default network name “RPi” hence you will either need to ensure only one is plugged into the network at a time or you could modify the network name in the file “smb.conf” to be RPi1, RPi2, RPi3, etc.
Next week I will describe the fun the pupils had writing the software for their version of the game. This Blog will be called…
“Count to 10 and Figure Eight My Pi!”
If you are interested in learning more about the Seven Segments of Pi visit my Web Site www.SevenSegmentsOfPi.com or watch the “Seven Segments of Pi” YouTube Video. You can also watch Carrie Anne Philbin playing “Figure Eight My Pi” at the CamJam, courtesy of Alex at RasPi TV.

Nevil Hunt
Innovations in Education