Part 1 | Part 2 | Part 3 | Part 4 | Part 5 | Part 6 | Part 7 | Part 8 | Part 9
Part 1
I’d like to thank Mike for inviting me to write this series of blog posts. The Raspberry Pi has such potential for teaching programming, we just need to come up with ways of using it to inspire the next generation of software engineers…but there are many trips-and-traps acting as barriers for schools looking to use Raspberry Pis in the classroom. In this series, I will share my experiences of running Raspberry Pi workshops in schools and hopefully help prevent other people falling into the same traps as I did! I will also try to describe what I think “worked” and what did not when trying to engage and inspire the interest of the pupils.
My first post is all about my first school visits in the weeks immediately after I received my first Raspberry Pi, and I am going to call it…
“Yes! …but what does it do!?”
It was 29th February 2012 at 5:50 a.m. and the alarm went off!
 I’m not normally up at this time but I knew my creaking old Windows PC would need up to 10 minutes to boot up so that I could order my first Raspberry Pi! So, at 5.58 a.m. I had two Internet Explorer windows open, one on the Farnell Web Site and one on the R.S. Web Site. It was being sold by both and I didn’t mind who I bought it from! There then followed an hour and 55 minutes of browser refreshing trying to place my order, but with no success. So I went for Plan ‘B’. Farnell were due to start taking telephone orders from 8 a.m. So, from 7:58 a.m. I phoned the Farnell Sales Order line and I kept hitting phone ‘redial’. Finally, at 8:20 a.m. I got through and placed an order for my first Raspberry Pi.
Then came a slight delay! The Raspberry Pi needed to pass some “EMC” tests before they could be shipped. These tests check it doesn’t interfere with our enjoyment of Radio 1 or corrupt that vital text message! I am an Electronic Engineer myself, so I know the “joys” of EMC Testing!
 Finally, on Saturday 12th May 2012, my first Raspberry Pi dropped through the letter box! A quick trip to Maplins to buy a power supply and an HDMI cable along with downloading the ‘Debian’ software onto an SD Card and by lunchtime I was up-and-running!
My interest in the Raspberry Pi has always been about its potential within education. I have been a STEM Ambassador for over 10 years, running Science Clubs, Construction Activity Days and Initiative Challenge Days. But like Eben Upton, I saw how children were being “turned off” computing by making them believe computing was all about Excel Spreadsheets and PowerPoint slides! Then along came the Raspberry Pi and I decided it was an opportunity for me to use it to promote software and electronics in schools.
I had several schools lined up for an “Introduction to the Raspberry Pi” talk. (With only one Raspberry Pi it was difficult to do much more!) And at one school while I was enthusiastically talking about USB ports, HDMI connectors and SD cards I remember clearly there was one boy who kept putting his hand up repeatedly asking:

“Yes! …but what does it do!?”
The same is true for the Raspberry Pi. I knew what it could do. But that pupil didn’t know…unless, of course, I were to come up with something so he could see what it could do!
I talked to people at work and asked how they got started writing software, and one guy, who is one of the best software engineers I’ve worked with, said at school in the 1980’s someone showed him he could connect an LED
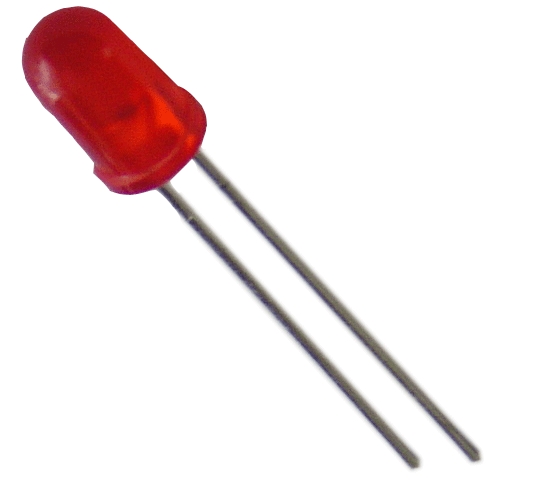
to the back of the school’s BBC Micro
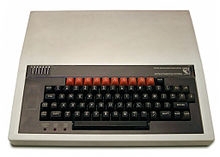
and control it by software!
And the LED came on!

He said from that moment he was hooked!
So I thought, yes, LEDs. Everyone likes flashing lights! Then another software engineer suggested connecting up a Seven Segment LED Display.
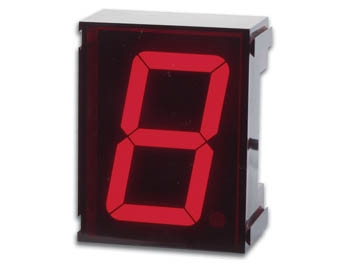
And so the Seven Segments of Pi was born!
Next week I will talk about some of the technical barriers to using the Raspberry Pi in the classroom in a Blog entitled
”Yes! …but all our monitors are VGA!”

Part 2
This week I was going to talk about VGA Adapters for the Raspberry Pi but about 10 days ago Mike emailed me to say “Are you going to the Manchester Jamboree?”
I must admit at the time it wasn’t on my radar! So I looked up the Web Site and realised that, not only was it to be the Manchester Jamboree…

…and the Raspberry Pi 2nd Birthday Celebration!
…it was to be held in conjunction with the “Education Innovation” Conference & Exhibition…

…so would not only be attended by Raspberry Pi enthusiasts, it would be attended by people from the world of education, looking at how to implement the government initiative to get pupils programming. I therefore had to be there!
So this week’s Blog will be about my 2 days last week at Manchester Central Conference Centre…

…attending the “Education Innovation” Conference & Exhibition and Manchester Jamboree and Raspberry Pi 2nd Birthday Party Celebrations which turned out to be 2 of the best “Pi Days” I have had! (Anyone waiting with baited breath for me to talk about VGA Adapters will have to wait a week or two!)
Happy 2nd Birthday Raspberry Pi
It was another early morning alarm on Thursday morning. 3.30 a.m!
I wanted to get to Manchester by about 8am and it’s a long drive from Berkshire! As I had my breakfast I received an email from Alan O’Donohoe, who was organising the Jamboree, saying Albert Hickey wouldn’t be able to do his “Slice of Pi” talks and would I like to talk in his place. So I volunteered to do a “Slice of Pi” talk on the “Seven Segments of Pi” at 4 pm that afternoon.
Since I had been a late addition to the list of attendees I had no idea if there would be space for me to set up my “Seven Segments of Pi” exhibition stand and demo, but I packed it in the car, none the less! I arrived at about 8.30am with everyone frantically setting up their stands ready for the 9.30am start. I found the CPC stand…

…with Kevin Howson waiting for the rest of the CPC people to arrive. I told him about the “Seven Segments of Pi” only for him to tell me that CPC have just added it to their catalogue! I therefore negotiated a corner of their stand for me to set up my stand and demo!!
At about 4pm on Thursday afternoon I did my “Seven Segments of Pi” presentation, which was hosted by Alan, who manages to keep the audience fully entertained in those hand-over minutes as one speaker is disconnecting their laptop from the projector and the next speaker is plugging their laptop in! I am told all of these “Slice of Pi” talks were videoed, so maybe in a few days it will be available for the world to see!
Over the 2 days I spent some time on my stand but I spent much of my time going round the other stands talking to people from the education world and people from the Raspberry Pi community, many of which I only previously knew as names on a Web Site. In particular it was great to talk to Simon Monk…

…who’s Web Site I had found back in May 2012 just after I had received my first Raspberry Pi, and, in response to the pupil who kept asking me “Yes…but what does it do?” I had decided to try hooking the GPIO up to an old Seven Segment Display I found in my electronic junk box. Through his guidance I found you needed to be in “Super User” mode to access the GPIO. You also needed to import RPi.GPIO to drive the GPIO from Python. I then (eventually) found that the GPIO were referenced by their P1 Connector pin number, not the GPIO number on the schematics or the Broadcom GPIO number!!!
It was also great to talk to Mike Cook, co-author of “Raspberry Pi Projects”…
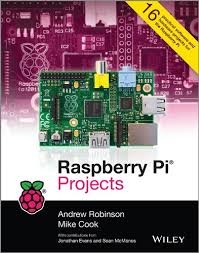
and “Raspberry Pi for Dummies…
…who’s entertaining discussions were in danger of seriously undermining his online persona where he calls himself “Grumpy” Mike Cook! One nugget of information I got from him was about SD Cards, and the fact that not all SD Cards are created equally! I had already found that after taking an image of a complete 4GByte SD Card it was not always possible to fit the .img file onto another 4GByte SD Cards since the original SD Card may have been a full 4GBytes but the other “4GByte” SD Card may only be 3.9GBytes! In particular Mike said he had found the Raspberry Pi runs faster with some SD Cards than with others! His recommendations were, DON’T use “Class 10” SD Cards. DO use “Class 6” SD Cards. And in terms of brand probably Samsung and SanDisk are the best. Can anyone else confirm “Grumpy” Mike Cook’s findings?
Whilst it was great to talk to these Raspberry Pi enthusiasts, the real value to me of the Jamboree was it taking place in conjunction with the “Education Innovations” Conference and Exhibition.
I talked to several quite influential people in the world of education and if anything further comes out of these discussions I will include details in later Blogs. But the clear message I got about the barrier to schools adopting the Raspberry Pi for teaching programming is that many teachers are daunted by the complexity! That is everything from knowing what bits to buy in addition to the Raspberry Pi itself (PSU’s, Mice, Keyboards, Monitors, Adapter Cables), to programming the SD Card, to understanding the vagaries of Linux. And that is before they even start teaching programming! So, we need to help teach the teachers!

…has made a start with their “Getting Started Tutorial Sheets” and the…

…initiative to get people like myself to register with them so we can help schools is also an excellent start, but there is a great deal more to be done! Videos can be expensive to produce, but a good set of training videos could make the life of a teacher, who has been told they must teach programming from September 2014, just a little bit easier!
Anyway, next week I will be back to talking about how the “Seven Segments of Pi” evolved in the Classroom, but I would like to finish by giving a huge vote of thanks to Alan O’Donohoe…

…and his “Jam Makers” for putting on such a wonderful Jamboree and 2nd Birthday Party, and acknowledge whoever’s idea it was to link it with the “Education Innovation” Conference & Exhibition. Pure genius! Just what the “Raspberry Pi in the Classroom” initiative needed!
Part 3
After last week’s…
I have returned with more ideas for Raspberry Pi add-ons…but they might have to wait until 2015! I am going to be busy this year getting “The PiTrol” and “PiDapter” ready…but I found some willing pupils who I met at the Jamboree keen to test-drive these kits!
Now back to 2012! I had just started going into schools with my shiny new Raspberry Pi only to get the response…

“Yes! …but what does it do!?”
This spurred me into action. I had to make it “do” something to gain their interest! Thanks to my colleagues at work I had decided to try and hook the Raspberry Pi up to a Seven Segment Display using the Raspberry Pi’s GPIO Pins.
The GPIO Pins are a feature of the Raspberry Pi which sets it apart from a “normal” PC. Connecting to the GPIO Pins allows you to directly control other electronics, something that was possible on the BBC Micro
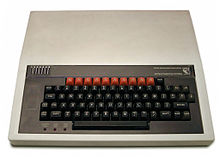
…in the 1980’s but became difficult to do on a “normal” PC in the 1990’s! (And if attempted, would be frowned upon by most parents!)
Part 3 “Building the Segments of Pi”
Rummaging through my boxes of old bits of electronics dating back to my time at Sheffield University I found a Seven Segment Display board I had built on Vero Board. I salvaged the 12mm Seven Segment Display and plugged it into a Breadboard. After downloading the Raspberry Pi Schematics I found the “P1 Connector” had 7 GPIO, labelled GPIO_GEN0 to 6. Just the right number for my display!
In the Dark Ages of 2012 no one seemed to have invented a convenient way to connect the Raspberry Pi’s “P1” Connector to a Breadboard (The Adafruit Pi Cobbler adapter…
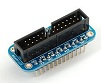
…came along some months later!) So I rigged up a “Heath-Robinson” Ribbon Cable to connect my Raspberry Pi to the Breadboard and I had…
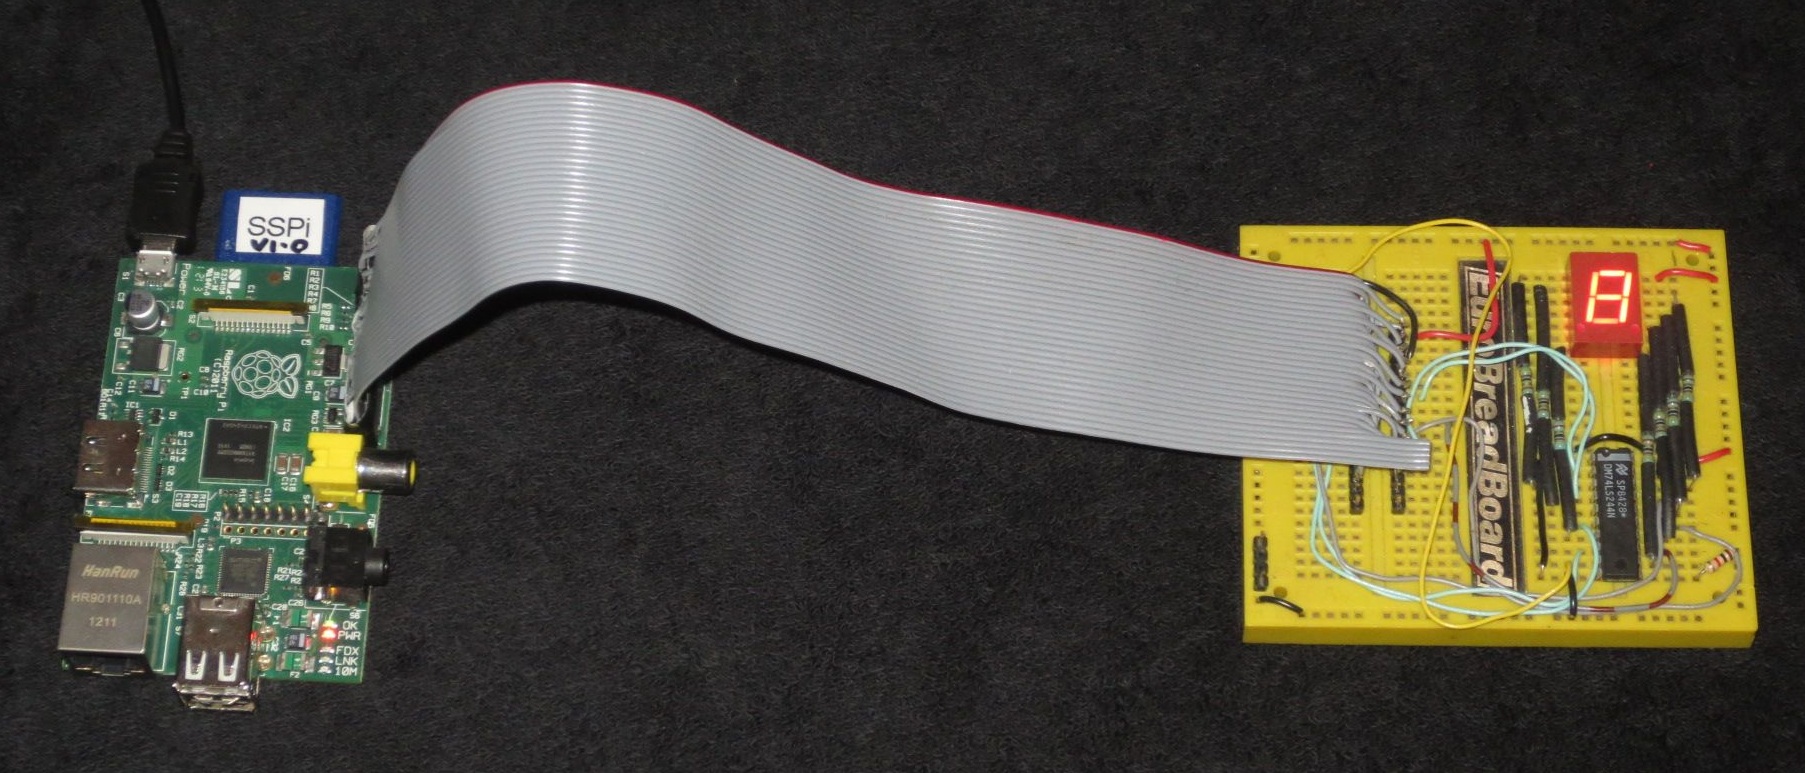
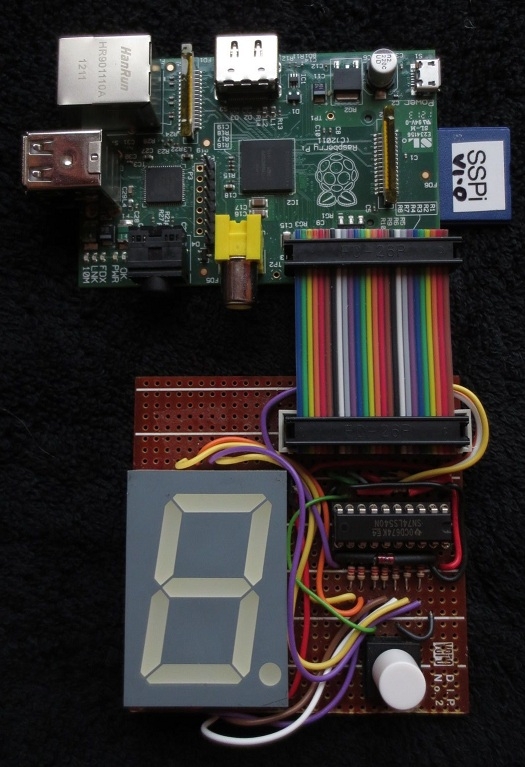
Seven Segments of Pi Mark I
I now just had the small matter of how to drive the GPIO from software! A few Google Searches later it was clear “Python” was the programming language of choice for the Raspberry Pi when using the “Debian” Operating System. I then found Simon Monk’s instructions…
…showing how to control the GPIO from “Python”. Following his instructions I downloaded the RPi.GPIO Python Library (this is now pre-installed in the Raspbian Operating System) and found I needed to be logged-in as “Super User” (sometimes referred to “Supervisor” “Administrator” or “sudo”)
I tried toggling GPIO_GEN0 as GPIO.output(0) in my “Python” software.
Nothing happened!
Looking at the Schematics I found GPIO_GEN0 was actually GPIO17 from the Broadcom chip. I tried toggling GPIO_GEN0 as GPIO.output(17) in my “Python” software.
Still nothing happened!
A few more Google Searches later and I found that the “Python” Library references the GPIO by their “P1 Connector” Pin Number (not the schematic signal name nor the Broadcom GPIO number) so GPIO_GEN0 is GPIO.output(11)!
It now worked! I had control of my Seven Segment Display!
There was one slight problem! I needed to set the GPIO to “False” to turn the Segments “on” and “True” to turn them “off”! That would be sure to cause confusion in the Classroom! So it was time for…
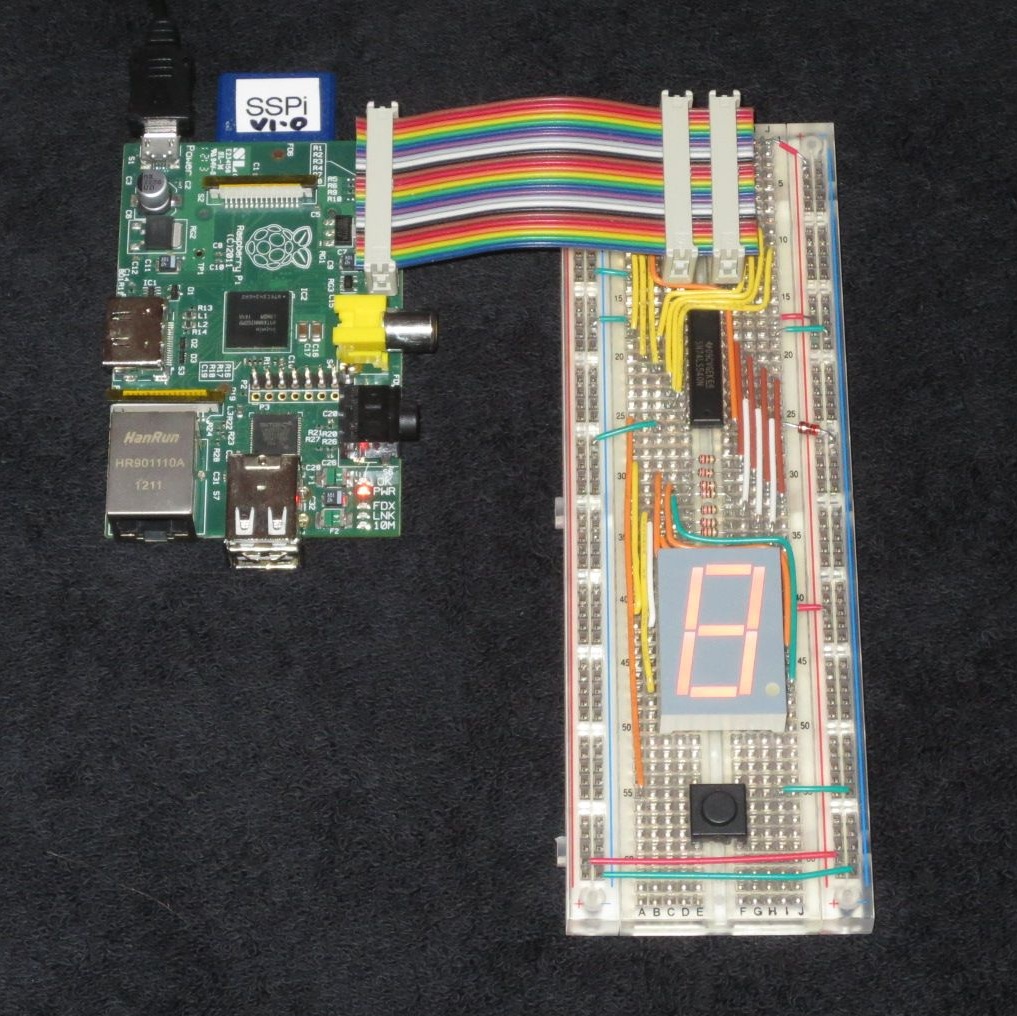
Seven Segments of Pi Mark II
A larger “common anode” Seven Segment Display driven by an Inverting Buffer now meant “True” turned it “on” and “False” turned it “off”! Two IDC Connectors on the Ribbon Cable allowed me to connect to the Breadboard in a more elegant way, and with the addition of a single PushButton as a GPIO.input I had something I could take back into schools.
I was still limited by having just one Raspberry Pi, but this time after my presentation I gave the pupils the chance to get their hands on the “Pi”!
I had written a Python Program that displayed the numbers 1,2,3 in sequence on the Seven Segment display when the PushButton was pressed…
Three pupils stayed behind to take a closer look. I showed them the Python software and said “See if you can make it count to 4!”
They had never written any software before but they were off!
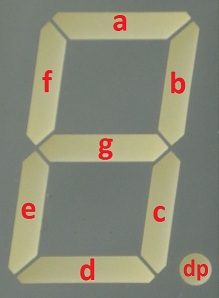
They quickly defined a new function called “four” and realised that to display the number “4” on a Seven Segment Display segments b,c,f & g must be “True”. The rest must be “False”…
But it still didn’t count to “4”! They had not called the function “four”!
A few syntax errors later and there was a “Yessss!” from the other side of the classroom. They had made it count to 4!!!
…and now they wanted to make it count to 5! …but it was 5.30pm and the teacher needed to lock up the Classroom! “Just give us a few more minutes so we can make it count to 5” they said. That was the moment I realised this simple idea of hooking the Raspberry Pi up to a Seven Segment Display “worked”! It was simple enough for someone new to programming to understand, but challenging enough to be satisfying when it “worked”! Now all I needed was a more comprehensive set of Software Challenges plus a few more Raspberry Pi’s and I could run Raspberry Pi Workshops in Schools!
Part 4
Last week I described how in June 2012 pupils had modified some Python Software on the Raspberry Pi to make the attached Seven Segment Display count to …
…and I realised I had something which answered the pupil’s question…
“Yes! …but what does it do!?”
…something I could use for Raspberry Pi Workshops in schools!
I still only had one Raspberry Pi, but I had plans to buy at least 2 more. With 3 Raspberry Pi’s I could probably run Workshops with up to 9 pupils. But whilst I could buy 3 Raspberry Pi’s, I didn’t have 3 Keyboards, Mice and Monitors.
Keyboards and Mice were easy. Most schools had plenty of USB Keyboards and Mice for me to borrow, but as soon as the teachers realised the only usable video output connector on the Raspberry Pi was HDMI…
 …I got the immediate response…

”Yes! …but all our monitors are VGA!”
…and there was no way schools were going to buy loads of HDMI TV’s just to run a few Raspberry Pi Workshops!
This seemed to be a bit of a road-block! I might be able to borrow 2 or 3 HDMI TV’s to run some workshops but it looked like a big barrier to the general acceptance of Raspberry Pi’s in schools!
A little bit of research was required! I had never taken much notice of how my PC attached to its monitor. I was familiar with the VGA input, but I found my PC’s monitor also had a DVI input…

…and that HDMI and DVI signals were compatible. So I attached my Raspberry Pi to the DVI input on my Monitor with a simple HDMI-to-DVI Cable…
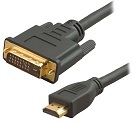
…and it worked!
I went back into schools to see if they too had DVI as well as VGA inputs on their monitors. Unfortunately most did not! “When we bought our PC’s, we had to buy the lowest cost monitors, and they were the VGA-only ones!” was the usual answer.
At one school however the teacher said “I’ve got an HDMI-to-VGA Adapter box in the car” It was worth a go. It was a bit cumbersome since it had to be mains powered, but it prompted me to search for other HDMI-to-VGA Adapters.
Searching on Amazon I found this self-powered adapter made in the far-east by “Neewer”**…
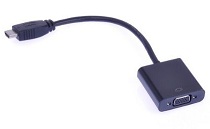
…with a user comment saying they had successfully made it work with their Raspberry Pi by modifying the Raspberry Pi’s “config.txt” file. It was only £12.99 so I ordered one.
It worked! I now knew I could run Raspberry Pi Workshops in schools. But what is more, I could tell schools…
“You don’t need HDMI Monitors to use Raspberry Pi’s in schools!”
**The use of the original “Neewer” Adapters was not entirely trouble free as I will describe in a later blog entitled “Doh! There’s no sound!” but their current version may be OK. I have also tested 3 other HDMI-to-VGA Adapters and all three have aspects I think could be better so I have asked for clarification from the manufacturers. Hopefully by the end of this series of Blogs I can recommend at least one HDMI-to-VGA Adapter!
Part 5
Last week I talked about some of the practical barriers to using the Raspberry Pi in the Classroom with many teachers believing they needed to upgrade their monitors to HDMI at the cost of £££ not realising that if their existing monitors support DVI all they needed was an adapter cable. Or, as is the case with many schools, they were thinking…
”Yes! …but all our monitors are VGA!”
…all they needed was an HDMI-to-VGA Adapter!
This week I will look at how I developed a more comprehensive set of Software Challenges (and ordered a couple more Raspberry Pi’s) so I could run Raspberry Pi Workshops in Schools in a Blog entitled…
”What can you do with just Seven Segments?”
In my role as a STEM Ambassador I had been asked by Kennet School in Thatcham to run a couple lessons for their GCSE Electronics pupils. When I worked for…
![]()
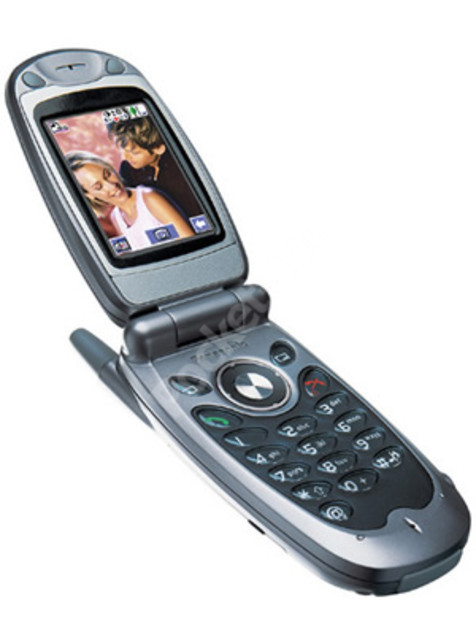
…in Thatcham about 10 years ago I was part of the Panasonic X70 Mobile Phone …
…design team, so I took along a number of old Panasonic X70 mobile phones for them to dismantle to help them understand the electronics inside. I asked if the school were doing anything with Raspberry Pi’s. I was told that Mel Poyda, Head of ICT was thinking about buying some. It just so happened that I used to work with Mel at 3Net, but hadn’t realised she had gone into teaching! I discussed my ideas with her and we decided to run a pilot after-school Raspberry Pi Workshop for a group of her Year 8 pupils. I ordered 2 more Raspberry Pi’s and decided their first software task would be to make the Seven Segment Display act as a Dice, a…

The pupils had never written any software before but were keen to learn! I didn’t explain any of the syntax rules of Python, I just said “look at the starting software that counts 1,2,3 on the Seven Segment Display (See Blog Part 3) and try and work out how by copying and modifying it you can make it count to 4.”
…“Now make it count to 5.”
…“Now make it count to 6!”
I then gave them this example Python program to generate Random Numbers…
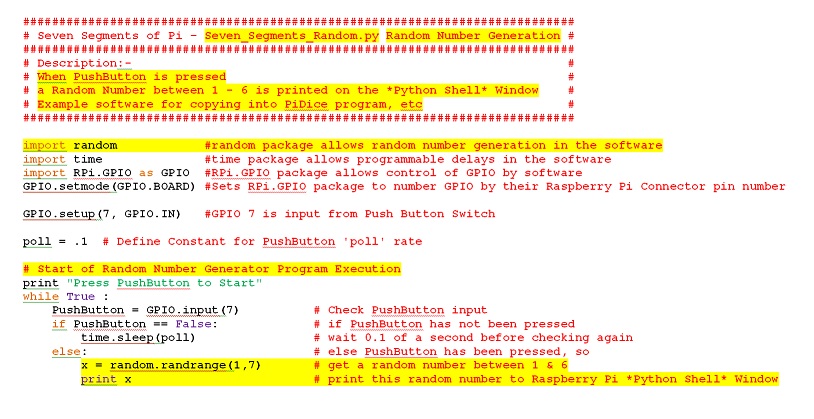
…in which I had highlighted in yellow the lines they would need to add to their program to generate the random numbers needed for a PiDice.
The Workshop went well! Within 2 hours the 9 pupils, working in 3 groups of 3, each had a working PiDice!
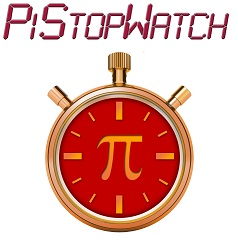
At the next workshop their second software task was to make the Seven Segment Display act as a StopWatch, a…
This introduced Sound Effects…

(which worked after I resolved a small technical glitch which I will talk about in a later Blog entitled “Doh! There’s no sound!”)…
…and State Machines…

…to control the flow of the program.
This task was a bit more demanding and took two Workshops to complete!
From the PiDice they now knew how to write Python for:-
- GPIO as Inputs
- GPIO as Outputs
- Time Delays
- Random Numbers
And from the PiStopWatch they now knew how to write Python for:-
- Sound Effects
- State Machines
They now had the software skills needed to write their first computer game…

Part 6 – Soldering is Fun! But respect the 300oC end!
Last week I talked about how in the PiDice Workshop pupils learnt how to write Python to control:-
– GPIO as Inputs
– GPIO as Outputs
– Time Delays
– Random Numbers
And in the PiStopWatch Workshop pupils learnt how to write Python to generate:-
– Sound Effects
– State Machines
Giving them the software skills needed to write their first computer game…
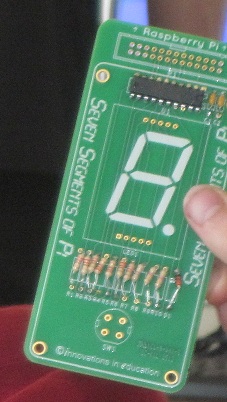
Writing the PiDice Software took the Year 8 pupils a single 1.5 hour Workshop. Writing the PiStopWatch Software took the pupils two 1.5 hour Workshops. Writing the software for the game “Figure Eight My Pi” would be more demanding! To complete it they needed to write most of the software in their own time…so they needed their own Raspberry Pi…and their own “Seven Segments of Pi”! That meant the Breadboard “Seven Segments of Pi”…
… and Veroboard “Seven Segments of Pi”…
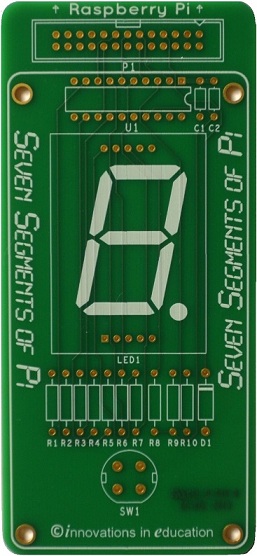
…would need to be made into a Printed Circuit Board!
I spoke to my friends at…

…who for nearly 20 years have been doing my PCB Layouts. They agreed to do the PCB Layout for free!
I then spoke to my friends at…

…who agreed to make the PCB’s for free!
I wanted the PCB to have the look and feel of a games console – possibly the simplest games console in the world? I also wanted the pupils to assemble the electronics themselves. I wanted to show them…
”Soldering is fun!”
The electronics needed to be clearly laid out to aid assembly. Unfortunately many electronic components can be fitted onto a PCB either way round…but will only work when fitted the right way round! So I added silk screen marking on the PCB to make the orientation of the components as clear as possible!
With the PCB layout completed at ALS in Berkshire the design files were sent up to Merlin in Deeside for fabrication. A week later the PCB’s arrived!
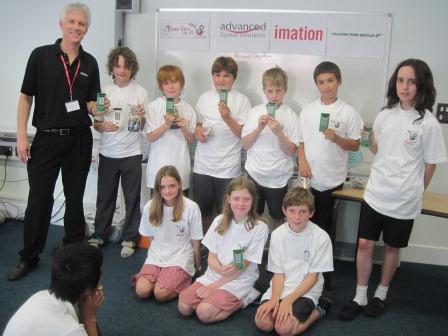
By now, in addition to the Year 8 Workshops at Kennet School, I was also running Workshops with Year 6 pupils at Blewbury Primary in Berkshire and Cholsey Primary in Oxfordshire.
At Kennet School in Thatcham their Design & Technology Dept kindly allowed us to use their soldering irons…
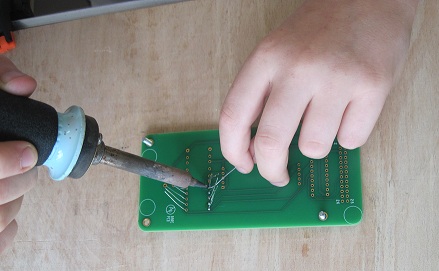
At the Primary Schools I supplied 3 soldering irons for the pupils to use. Most of the pupils had never soldered anything before but they loved it!
Although one pupil never did get the hang of returning the soldering iron to its stand! He seemed to treat it like a pencil, and kept putting it straight down on the table…forgetting that the tip was at nearly 300oC!!! A bit of supervision was therefore necessary!
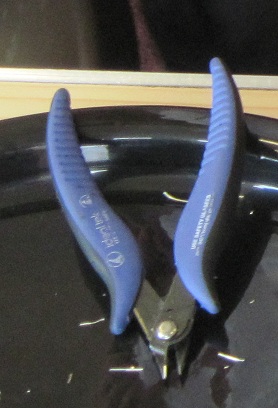
Essential tools in addition to the soldering iron and solder were a pair of wire cutters…
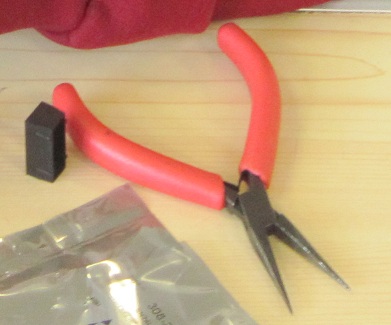
and small pliers…
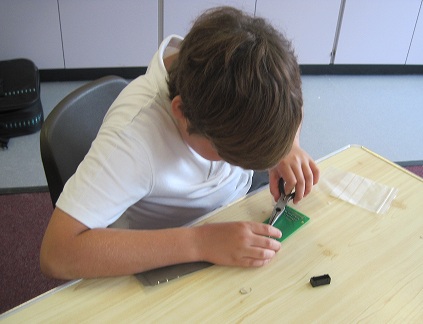
It took the pupils two 1.5 hour Workshops to assemble and solder their “Seven Segments of Pi” PCB’s…but they didn’t all work first time! Most faults could be spotted by a close visual inspection so I gave them a magnifying glass…

…to check their soldering!
Common faults included
A) – Solder joints not soldered.
B) – Solder joints poorly soldered.
C) – Solder shorts.
D) – Component wires shorting.
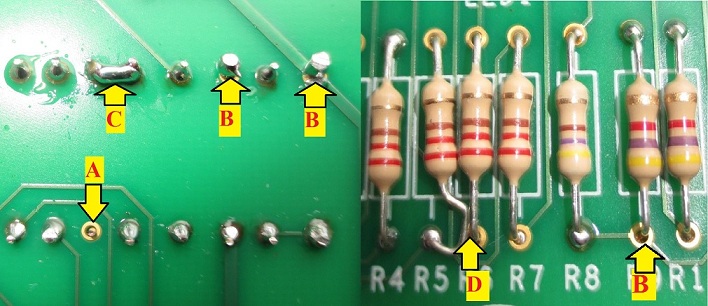
Most of these could be rectified just using the soldering iron, pliers and/or cutters, but for some large solder blobs I used a solder-sucker…

or desoldering braid…

I know not all schools have access to soldering irons hence I plan to offer “Seven Segments of Pi”boards both in kit form and pre-assembled. I want as many pupils as possible to have the chance to take on the challenge! But where schools can organise access to soldering irons, soldering the kit adds an extra dimension to the challenge! Even if their “Seven Segments of Pi” boards don’t work first time there is an extra sense of achievement when they find the fault, correct the fault and then it works! And when they write their software, they are not writing software to run on a “Seven Segments of Pi” board, they are writing software to run on their “Seven Segments of Pi” board!
The pupils now had their own “Seven Segments of Pi” board…
They now needed an SD Card…
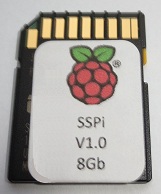
…so they could write their “Figure Eight My Pi” software! But the SD Cards would be plugged into the school’s Raspberry Pi during the Workshop then plugged into their own Raspberry Pi when they got home! It had to work in both!! And it had to still be in their possession when they got home!!!
Last week I talked about the fun of soldering! This week I will describe some of the technical and practical challenges I faced running a Raspberry Pi Workshop in which pupils were encouraged to carry on writing their software at home. This Blog will be entitled…
”NOOBS to the rescue! …but Mr Hunt – I’ve lost my SD Card!”
The pupils now had their own “Seven Segments of Pi” board…
I was keen that as many pupils as possible bought their own Raspberry Pi so they could carry on programming at home. The lesson from the 1980’s boom in computer programming in the UK was that whilst pupils may have been introduced to programming in the classroom on a BBC Micro…

…it was the pupils who had a BBC Micro, ZX-81 or ZX-Spectrum at home allowing them to carry on programming in their bedroom, who excelled! And this is how many of today’s talented programmers in the UK developed their skills! The Raspberry Pi gives us the chance to repeat that success.
I suggested the parents of my pupils buy a Raspberry Pi for their son/daughter. Many parents were bamboozled by the Raspberry Pi! If you are not an enthusiast it’s not clear what to buy! And what you need to buy depends on what you’ve already got! Many households may already have a suitable Micro USB Power Supply, USB Keyboard, USB Mouse and/or PC Speakers that could be used. But like the schools the main confusion was with the monitor! The parents who had heard of the Raspberry Pi assumed it would have to plug into an HDMI TV. Some thought they could plug it into the Composite Video input of an older style TV. (Not a good idea if you want to be able to read the text in your programs!) Most had no idea at all! I therefore wrote a “What to Buy” guide for the parents, explaining the options.
(I will post an updated version of this “What to Buy” guide on my Web Site when I have an HDMI-to-VGA Adapter I can recommend!)
They now needed their own SD Card!
In the Workshops I used the Raspbian SD Card image downloaded from www.raspberrypi.org. This was OK for the Workshops but needed different settings in the “config.txt” file to operate with different monitors. I wanted the pupils to be able to plug their SD Card into the school’s Raspberry Pi’s during the day then take it home and plug it into their own Raspberry Pi at night. Changing the “config.txt” file each time would be a nightmare!
My work colleague who was monitoring the www.raspberrypi.org daily Blog mentioned to me something called “NOOBS” standing for “New Out Of the Box Software”.

The Raspberry Pi foundation had recognised this very problem and NOOBS was their solution! I downloaded the “NOOBS” image and tried it out. It worked with my DVI Monitor. It worked with my VGA Monitor. It also worked with my HDMI TV (although the text was a bit small!). But the main thing was that it worked with all three types of monitor without having to modify the “config.txt” file!
NOOBS had come to my rescue!
I spent the weekend loading the Seven Segments of Pi files onto my NOOBS SD Card then copied it onto a couple of dozen blank SD Cards to give out to the pupils.
But looking at the SD Cards, they were quite small! If I gave them out this week I wondered, would I return next week to hear…
“Mr Hunt – I’ve lost my SD Card!”
I envisioned them in pupil’s pockets only to disappear when they took their handkerchief out to blow their nose! And that would be end not only of their SD Card, but of the software they had written too!
I searched the internet for a solution! And found these SD Card Key Rings…and small Climbing Clips…
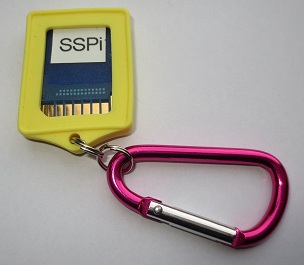
With an SD Card Key Ring** they could insert their SD Card in their Key Ring at the end of the lesson and use the Climbing Clip to attach it to their belt hooks.
They worked! Over the remaining weeks until the end of term not one pupil lost their SD Card! There was one pupil however who didn’t lose his SD Card, but did manage to lose his SD Card Key Ring!! There is only so much you can do!!!
**The PiHut have just started stocking these SD Card Key Rings & Clips!
http://thepihut.com/products/sd-card-cases-with-carabiner
Since running the workshops I’ve added these ‘extra features’ to the “SSPi” SD Card supplied with the kit to make it easier to use in the classroom:-
a) Custom SSPi NOOBs. The “SSPi” SD Card supplied with the kit is a Custom “Raspbian+SSPi NOOBS” image. This means it not only contains the usual NOOBS Raspbian Operating System and associated files, it also contains the Seven Segments of Pi files and the extra features below. But the advantage of it being a “Custom NOOBS” image is that once a pupil has completed the challenge the SD Card can be easily “reset” ready for the next pupil by holding the “shift” key down as the Raspberry Pi boots and following the on-screen instructions. Warning – This will delete all the software written by the previous pupil!!!
b) Seven Segments of Pi Instructions Manual on “SSPi” SD Card. As well as being available to download from the Web Site, the PDF of the Instructions Manual is included on the SD Card so it is always readily available for reference. I recommend having printed instruction manuals available for the pupils and I plan to make printed manuals available as an optional extra when buying the kit.
c) Short Cuts on Desktop. A short cut to the Instruction Manual and IDLE (the Python Editor) are provided as icons in the centre of the home screen. The Raspberry Pi has two Python Editors, IDLE and IDLE3. The Seven Segments of Pi software is written for the IDLE editor and will give syntax errors if it is run using IDLE3. The desktop shortcut help ensure pupils run the correct editor.
d) Customised Web Browser. With a ‘standard’ NOOBS SD Card “Midori” (the Web Browser) comes configured when running the GUI using “startx” but is not properly configured when running the GUI using “sudo startx”. Since to drive the GPIO for the Seven Segments of Pi it must be run as “sudo startx” I have configured “Midori” including shortcuts to useful Web Sites.
e) Remote Login. Getting files on and off the Raspberry Pi can be difficult! It can be done with a USB Memory Stick as described on Page 31 of the Manual. A better way, also described on this page is to connect the Raspberry Pi to your network via an Ethernet Cable. The SSPi SD Card has Remote Login ‘enabled’ to allow the transfer of files between the Raspberry Pi and a Windows PC. This can be used for instance to load new sound effect files onto the Raspberry Pi or more importantly to allow the teacher to take back-up copies of the pupil’s work at the end of each lesson! All SD Cards will have the same default network name “RPi” hence you will either need to ensure only one is plugged into the network at a time or you could modify the network name in the file “smb.conf” to be RPi1, RPi2, RPi3, etc.
Part 8 – Count to 10 and Figure Eight My Pi!
Last week I talked about the technical and practical challenges of running Raspberry Pi Workshops in schools. This week it’s back to the fun of writing software! It’s about how pupils were inspired to come up with their own ideas and how I came up with a game to play on the Seven Segments of Pi! This Blog is entitled…
”Count to 10 then Figure Eight My Pi!”
When running the…
…workshop some pupils realised that, whilst a normal dice has 6 sides, hence when thrown can only give a number up to 6, a PiDice does not have this limitation! A single digit Seven Segment Display can display any number up to 9. So some pupils modified their PiDice software to give a random number from 1 to 9.
When running the…
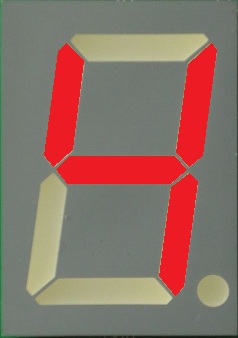
…workshop a single digit was more of a limitation. The StopWatch could only count to 9. But one pupil proudly said to me “I’m going to make my PiStopWatch count to 10!” I explained to him he would need a two digit Seven Segment Display to display two digit numbers but undeterred, he declared he was going to do it anyway! 15 minutes later he called me over. “I’ve done it Mr Hunt!” he said. I went over and saw his display showing the number ‘0’. He pressed the red PushButton and his PiStopWatch counted 1…2…3…4…5…6…7…8…9…then it displayed…

…which when rotated 90 degrees looked like this…

He was right! He had made it count to 10! He had realised that having individual control of all seven segments meant he was not limited to just displaying conventional numbers. He could illuminate any combination of the segments…and he had realised that this combination when rotated 90 degrees looked like the number 10!
This was a wonderful moment! It prompted me to tell them about the hexadecimal numbering system, widely used in electronics and software as a shorthand way to write binary numbers, where the numbers 10,11,12,13,14,15 are represented by the letters A,B,C,D,E,F…and how these too can be displayed on a single digit Seven Segment Display so long as they are represented as A,b,C,d,E,F. Maybe because they now saw themselves as budding Software Engineers, they were fascinated to know about the way computers count!
When I first came up with the idea of using a Seven Segment Display to teach the basics of programming I quickly had the idea of making it act as a Dice or as a StopWatch, but I wondered if I could come up with a game. I think games are a great way to learn! In my STEM Ambassadors lessons I’ve come up with a dice game called “Numba Jumba!” to practice mental maths and a card game alternative to “Connect Four” called “Connect Ten to the Power Minus Four!” But how could I make a game using just Seven Segments?
I remembered my old…

…set and how I started with an oval…

…then was given a few more curves and straights to make a figure eight…

So I imagined a single segment appearing to going round the display in a figure zero…
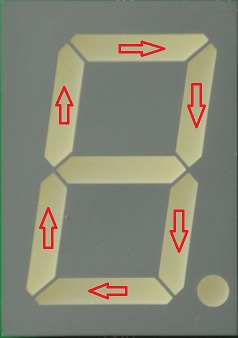
…and then in a figure eight…
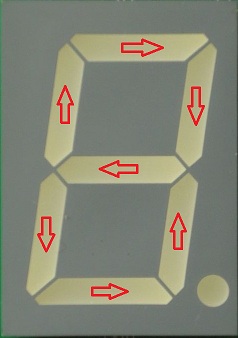
It could be programmed as a ‘State Machine’ similar to the PiStopWatch. Sound Effects introduced in the PiStopWatch could make it sound like a game. Then if it were to randomly switch between ‘figure zero’ and ‘figure eight’ using the ‘Random Number’ function from the PiDice with the player having to press the PushButton when the centre segment was illuminated, it would become a game!
I asked my son, Matt Hunt who is a Car Designer, if he could come up with a cartoon character looking a bit like a Seven Segment Display to go with the game and whilst chatting to him in Munich via Skype he sketched…
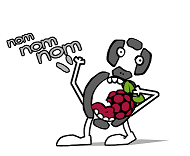
…which I christened ‘The PiSeg!’
Describing the single segment going round the display as ‘The PiSeg’ and the “nom, nom, nom” sound effect was it munching on a Raspberry I had the game…

Part 9
Last week I talked about how I came up with a game to play on the Seven Segments of Pi called “Figure Eight My Pi” and enjoyed seeing how the pupils were inspired to come up with their own ideas. In this week’s final Blog in the series I will describe how the pupils embraced the challenge of writing their first computer game! I will also return to the thorny issue of sound from the Raspberry Pi when using a VGA Adapter! This Blog is entitled…
”Have the Audacity to make your own sound effects!
…D’oh! There’s no sound!”
When running the…
…Workshop I introduced Sound Effects which brought the Seven Segments of Pi ‘alive’! Sound Effects make such a difference and would be needed when the pupils wrote their own version of game “Figure Eight My Pi”! I got a sound effect file “doh.wav” with Homer Simpson saying…

…and gave the pupils a Python program, “Seven_Segments_Sound.py”, demonstrating how to generate this sound effect from Python. I was sure it would raise a chuckle when the pupils heard it!
Everything worked fine at home. I had Homer Simpson coming out of my PC Speakers plugged into the Headphones Jack of my Raspberry Pi!
I went into the first school.
They ran “Seven_Segments_Sound.py”
“Now press the red PushButton” I instructed expecting a cacophony of Homer Simpsons…but instead there was silence!
- Were all the leads plugged in? Yes they were!
- Were all the speakers turned on? Yes they were!
- I was stumped! It had worked fine at home!
I returned home, plugged everything together and ran the same “Seven_Segments_Sound.py” program on the same Raspberry Pi connected to the same speakers. Homer Simpson was heard loud and clear!
I went into the second school, confident that I now had the sound working, but once again Homer Simpson stubbornly refused to co-operate!
What was going on? The only difference between my setup at home and the setup in the Classroom was the monitor. How could the monitor have anything to do with the sound?
I discovered that the Raspberry Pi has 3 audio modes…
- 2 = Digital where audio is always sent out of the HDMI port to an HDMI television
- 1 = Analog where audio is always sent out of the 3.5mm Jack to Headphones or PC Speakers
- 0 = Auto where the Raspberry Pi detects the type of monitor connected and sends sound to the HDMI port if it thinks an HDMI TV is connected, otherwise it sends audio to the 3.5mm Jack.
…and “Auto” is the default mode.
At home I used a DVI monitor, which the Raspberry Pi correctly established was not an HDMI TV hence sent audio to my PC Speakers. In school, since the schools only had VGA Monitors, I used HDMI-to-VGA Adapters. These adapters were confusing the Raspberry Pi causing it to send audio to the HDMI port!
I found the Linux Command…
sudo amixer cset numid=3 1
…would force the sound out of the 3.5mm Headphones Jack.
That would be fine for the Workshop but when the pupils returned home with their SD Card and plugged into their Raspberry Pi attached to their HDMI TV they would get no sound! Auto Audio Mode needed to work with HDMI-toVGA Adapters and to do so the HDMI-toVGA Adapters must correctly report back to the Raspberry Pi that it is not an HDMI TV!
By now I had ten HDMI-to-VGA Adapters, all bought from Amazon and all supposedly made by Neewer. I tried them out and found 4 worked fine in Auto Audio Mode, correctly sending audio to the PC Speakers. 6 didn’t!
I have now checked several different HDMI-to-VGA Adapters and most don’t handle Auto Audio Mode correctly! I can’t recommend Neewer since there seems to be no way of knowing which version you will receive! The only HDMI-to-VGA Adapter I’ve tested which handles Auto Audio Mode correctly (as well as correctly converting the video) that I can provisionally recommend is the Patuoxum sold by Patox, available via Amazon.
Back to the Classroom!
I now had over 20 pupils from 3 schools, aged from 10 to 15, most of whom now had a Raspberry Pi at home, writing their version of the game “Figure Eight My Pi!”
It was quite a challenge. Some had parents who were software engineers to help at home, many did not! But they were all making progress!
Just like the PiDice and the PiStopWatch they were not starting with a blank sheet of paper. I provided them with the starting software in which a single segment (The PiSeg!) went round the Seven Segment Display in a figure zero…
Their first task was to make the single segment go round in a figure eight…
…then make it randomly decide whether to go in a figure zero or a figure eight.
…then add Sound Effects
…then detect if the PushButton is pressed when the centre segment is illuminated.
…then speed up a little each lap.
…then keep a score.
They had now written their first computer game…
Some progressed faster than others. But that was fine! The pupils who by now had a working game became my Classroom “Software Support Engineers” and I employed them to help resolve the bugs in the software of their fellow pupils. This worked really well! Pupils now had help other than from me! And my “Software Support Engineers” had an opportunity to demonstrate to their fellow pupils, their new-found software skills!
I still wanted to stretch the most able! So I gave them the challenge of making their own sound effects to use in their game by using the free audio capture and editing software…

Finally the end of term arrived. I was having one last workshop before they demonstrated what they’d achieved to their fellow pupils, teachers and parents. It was nearly lunchtime and I was helping a pupil solve a tricky bug and I could hear the other pupils in the room…but when I looked round the room was deserted! They had left their games playing and what I was actually hearing was their voices, recorded and edited using Audacity, being played as sound effects in their games!
So on the last day of term they demonstrated what they had achieved. I had nothing more to do. I had no more software bugs to solve or bits of electronics to fix. I could just enjoy seeing the pride the pupils had explaining how their software worked to their fellow pupils, teachers and parents! It was without doubt one of the most satisfying moments in my life as a STEM Ambassador and gave me the spur to making the “Seven Segments of Pi” available as a kit so other pupils have the chance to take on the “Seven Segments of Pi” Challenge! And maybe in years to come the Raspberry Pi will be seen as having been the catalyst to creating a new generation of software and electronics engineers!
Thank you for following this series of Blogs. If you are interested in learning more about the Seven Segments of Pi visit my Web Site www.SevenSegmentsOfPi.com or watch the “Seven Segments of Pi” YouTube Video. You can also watch Carrie Anne Philbin playing “Figure Eight My Pi” at the CamJam, courtesy of Alex at RasPi TV.

Nevil Hunt
Innovations in Education