
This weekend has given me time to work my way through my ‘review pile’. I’m almost to the bottom of the pile now – just one book to go. In the meantime, however, I tried out two motor controller boards from 4tronix.
Introduction
At the moment, there is a certain saturation in the motor controller board (MCB) market. There are boards available in a variety of form-factors and from various vendors and re-sellers. So, what can a new motor controller board, or indeed two, have to offer?
To answer this question, I got hold of a couple of new MCBs from Gareth at 4tronix who are based in Derby. Gareth’s solution to the market saturation is to build boards that are simply loaded with features. It’s certainly a compelling argument, so let’s see what he’s come up with this time!
RoboHAT

First up is the RoboHAT. This is a full HAT-sized, pre-assembled board with the following features:
- A 5V switching regulator that allows the board to be powered, and to power the Pi, from a 7-10V source.
- Dual H-bridge chip to drive two DC motors (or two pairs)
- Six 5V level shifted GPIO inputs with 3-pin connectors.
- Four 5V level-shifted GPIO outputs with 3-pin connectors (capable of driving servos).
- 4-pin header for an ultrasonic distance sensor.
- I2C breakout connector.
- Mounting screws and spacers to attach the HAT to the Raspberry Pi.
That’s an awful lot of features, and an awful lot of motors, especially if you use all the outputs for servos.
Installing the HAT is just a case of plugging it in. It has an EEPROM which configures the necessary overlays and turns on I2C. The instructions are simple – download an installation script and run it. Included in the downloads is a Python library and several test scripts.
I used these test scripts to try the HAT out. I connected up a 4xAA battery pack, two DC motors and two servos and ran some of the scripts and off the motors went. Very simple, very well-featured and, for £24 (inc VAT), very good value. You can get hold of one from the 4tronix website.
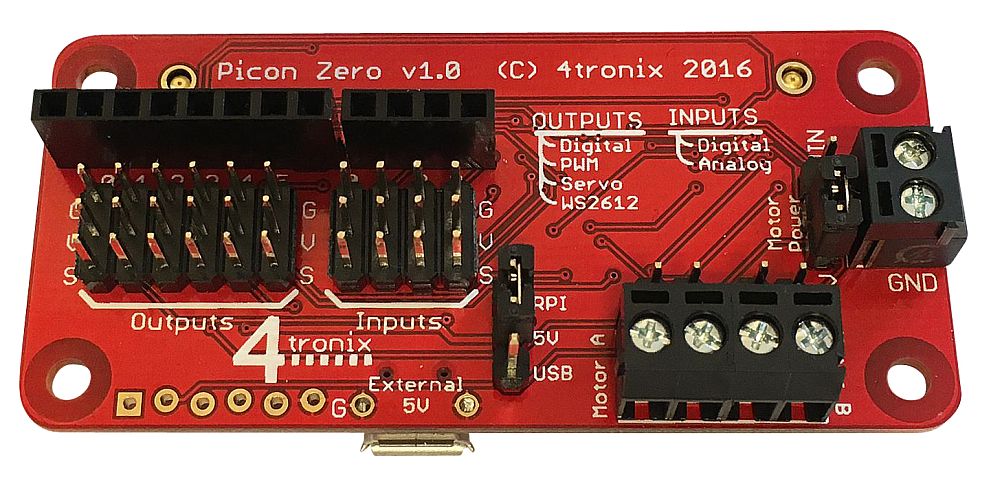
Picon Zero

Second on the review pile was the Picon Zero. This is, surprisingly enough, a Zero-form-factor board. It is pre-assembled and has the following features:
- Two full H-bridge motor drivers capable of giving up to 1.5A per channel (2A max) in forward and reverse directions.
- Six general purpose 5V 3-pin output channels that can be set as digital, PWM, servo or WS2812 (aka neopixels).
- Four general purpose 5V 3-pin inputs that can be set to digital, analog or DS18B20 (digital temperature sensor).
- Extra GPIO pins broken out into headers.
- A header for I2C.
- Motors can be powered either from the Pi’s 5V power source or from an external battery pack.
In my opinion, the Picon Zero is actually the superior board in comparison to the RoboHAT. Yes, there is a bit more manual configuration to do (in the form of a manual apt-get installation of the I2C libraries) and yes it is smaller and has fewer power options. And no, it doesn’t power the Pi from the battery pack.
However, it has more output channels (and therefore can be used to control more servo motors) and, intriguingly, it has analog inputs. The option to set the outputs to digital, PWM, servo or WS2812 is terrific and the ability to simply power motors from the Pi’s 5V power source gives you a lot of flexibility to ‘just use it’ without messing about with a battery pack if your motors are low-powered.
I plugged in two micro metal gear DC motors and four (!) servos into the board and powered them all from the Pi’s 5V line with no trouble.
Like the RoboHAT, the Picon Zero has an installation script that downloads a library and several example scripts. Using these scripts made my motors turn and I had a lovely little display of spinny things with very little effort.
The price is £16 (inc VAT), which is very reasonable, and you can get hold of one from the 4tronix website or from The Pi Hut.
Conclusion
These two boards from 4tronix are excellent. Sure, they are a little more expensive than some (but not all) other options, but the number of features on the boards, and the sheer technical beauty of the board design, are great compensation for that. Honestly, if I was looking for a motor controller board that could control loads of motors, there really isn’t much competition and I have no hesitation in recommending them.
When I was researching for workshop I got myself a PiConZero and the RasPiRobot V3 (from Simon Monk). This has a HBridge, powers the Pi and can run the Ultrasonics too.
I did not need to use either board but got the RRB3 running some motors.
I’ve yet to try out the PiConZero but that has lots of potential, being I2C it could easily be driven from a different microcontroller board too.
Have been unable to find out what speed the Picon Zero can read an analog input – any details?
From the horse’s mouth, as it were: Gareth: The ADC is actually in the ATMega328P specs, running at 16MHz. But actually getting the answer back to the Pi is subject to a number of latency delays: the control loop I am running and the I2C protocol.
Me: Also, it’s not easily quantifiable as there are a lot of non-real-time operations happening on the Pi.
Thanks Michael and Gareth
I guess that getting analogue readings with this board should be taken in the context of the robot world where this will no doubt be fast enough. I come from the world of real-time input of software designed radio where speed and latency are problems. Presumably suitable buffering on the ATMega and use of highest speed i2c could get a fast throughput.
I can also vouch for the PiconZero as a noob. First time after a few attempts, my boys and I managed a twist on the zerobot project with stepper motors. As a learner with my boys we struggled to get much out of it; my boys understandably lost interest.
No with the PiconZero we are having great fun, managed to combine a few of the demo projects to make our little robot drive under remote control around the room. (VNC from Chromebook). We added an 8 way neopixel strip then shows white when towards, red in reverse and the edges go orange when turning. OK, not super impressive yet, but my boys are engaged still and we are learning together. Looking forward to scratch support so they can also use on their own
.
Great to hear you’re getting on well with it. ScratchGPIO support is in the works! 🙂
Is there a way that Piconzero can receive RC receiver signals, thus allowing inputs from an RC controller?
I don’t know, is the honest answer. Try tweeting @4tronix_uk on Twitter – Gareth should be able to answer the question.
Great review. To be honest the cost is fantastic if you factor in the excellent examples and information. As a noob to Pi and Python myself and my boys have achieved and learnt so much since buying the PiconZero. The test scripts alone have taught us so much. Tweaking, combing then adding extras.