
William Knowles wanted to create a penetration testing tool and ended up using a Pi. It has since ended up being a data collection device in his Industrial Control System research as a packet capture device. Read here how he’s done it.
William Knowles wanted to create a penetration testing tool and ended up using a Pi. It has since ended up being a data collection device in his Industrial Control System research as a packet capture device. Read here how he’s done it.

Horsham-based company Lincoln Binns create enclosures… but these enclosures will stand up to a ridiculous amount of punishment. They make them out of aluminium and they’ve now created one for the Pi (pictured). Starting at around £22+VAT (with greater quantities seeing a discount), these cases provide extreme protection for your little computer. They’ve even tried crushing the case with their company van – see below.

They are currently looking for a distributor for the case but will happily sell them individually from their site.
So, if you’re looking for an industrial-use case for the Pi, take a look at their page for more information.
If you’re a distributor and you want to discuss things, contact them at info@lincolnbinns.com to have a chat about it.

Alex Bain has written a great tutorial, and also some supplementary articles, on using an infrared controller with the Raspberry Pi. It uses LIRC and includes examples on how to do the configuration and read the commands sent from the controller. Read his blog here
Recently, Life Hacker published a competition to determine the best 5 cases for the Raspberry Pi. Now, obviously I’m just one person, but looking at their list I don’t think they’ve got all the best ones. So, instead I thought I’d give an overview of my favourite cases. These aren’t in any particular order, and some of them do crossover with the Life Hacker list. I’m covering only cases that are available right now, so beautiful cases like the one myself and @Geeky_Tim got from The Pi Hut don’t qualify (as that one is not available any more). I’ve tried to give links to The Pi Hut to buy them where I can as they’re my local, recommended supplier for Pi bits, but you can get these cases from many different suppliers.

The PiBow was designed by Paul Beech, who designed the original Raspberry Pi logo. It is made up of layers of acrylic (hard plastic) that you fit around the Pi, building it up as you go. It leaves all the ports accessible, including the GPIO if you use a ribbon cable to break it out. The PiBow comes in a variety of colours including: rainbow (pictured), ninja (black), toxic (kind of a greeny-yellow), crystal (white clear), special Adafruit (dark turquoise) and timber (wooden). There are various special editions that become available occasionally and there are also versions for the Model A (with less layers), a special VESA-mount layer and now a special version for use with the PiTFT mini-touch-screen. You can pick one up for between £10-15. I recommend getting them either from The Pi Hut or from Pimoroni (who make them). There are various cheap knock-offs, ermmm I mean, clones, available but the originals are the best with decent port labelling and layer numbering.
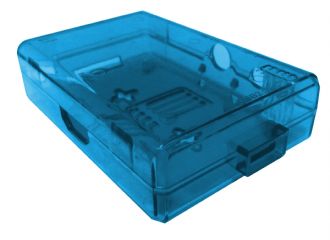
If you’re looking for a budget case that does the job extremely well, you can’t get better than the SB Components case. They come in a variety of coloured (burgundy, green, orange, pink, blue, yellow, clear) transparent plastic and are extremely hard wearing. There’s also a solid black and a solid white version. The case is made of two halves which snap together, with slots for all the different ports, including the DSI and CSI ribbon cable ports. There are versions for both the Model A and the Model B and there are also versions that hide the GPIO, CSI and DSI ports. The price is extremely attractive – £3.99 for the Model A, £4.39 for the Model B. Head on over to SBC if you’d like to get hold of one.

Held by many as the best case on the market, this case from Cyntech is really well designed and made. It is comprised of two halves which are held together by screws. One of the USB ports and the ethernet ports are covered by snap-out pieces of plastic, so if you want to use it for a Model A you can leave them there, and if you want to use it for a Model B you just pop them out. The case also comes with a handy option – a cover for the SD card slot which retro-fits between the two halves of the case. It’s one of the very few cases out there that can protect the SD card and the slot from accidental droppages. The case is opaque but the indicator LEDs of the Pi are brought up to the surface of the case via plastic light pipes. The CSI/DSI ports are not accessible, but there is a slot for a GPIO ribbon cable. It’s a very solid, very attractive case that comes in the following colours: black, white, blue and pink.
You buy the case from Cyntech for £4.99 plus shipping or from The Pi Hut for £5 plus shipping.

This is another budget case, this time from ModMyPi. It’s a case that has been around for a very long time but it still stands up with the best. The case comes as two halves which snap together and allows access to all the ports including the CSI and DSI ports. It’s made of fairly substantial plastic and it’s easy enough to leave the top layer off if you want to see your Pi in all it’s glory. It comes in electric blue (pictured), translucent, white, black, red, green, pink and orange. You can also mix and match your two layers. ModMyPi also offers a ‘Gamble’ option in which you’re sent two halves of random colour, essentially whatever they have left, but at half the price of the normal case. The normal cases can be purchased from ModMyPi for £5.95 and the Gamble case comes in at £2.99. You can also get them (not the Gamble) from The Pi Hut.

This one doesn’t really have an official name, and I don’t know where it originally came from (though I suspect it was Adafruit who open-sourced the design). It’s very similar to the ones used for the Google Pis that were given away to schools. If you want a very solid, very protective case that looks good (thanks to the Pi logo on top), you can do a lot worse than buying this budget case. At £4 it’s cheap but solidly made. It clips together very solidly but doesn’t expose the GPIO/CSI/DSI ports. It has a curved front (taking care of the slightly projecting USB ports in a practical, and very stylish way) and comes in solid black and clear flavours. You can buy them at The Pi Hut.

This is not just a case, so I’ve chosen it as an ‘extra’ one – it’s a complete enclosure with keyboard and breadboard for your Pi. I originally had my doubts about it due to the angle of the keyboard but I’ve since had a go on one and it’s easily usable for heavy-duty programming. The FUZE hides the Pi beneath a strong metal skin that you wouldn’t want to drop on your foot. It’s been designed to be rugged and suitable for classrooms and comes with a wealth of educational material to get you going with both programming and hardware experiments. The GPIO pins are brought out to a built-in breadboard, making it easy to hook up circuits. The whole thing has a very ‘retro’ feel to it. It’s not the cheapest at £180 without monitor, but it is a lovely piece of design and engineering, especially for young people who might knock it off the desk! You can buy one direct from FUZE or you can go to Maplin.
I hope you’ve enjoyed this round up of what I consider to be the top 5 cases for the Raspberry Pi. As I said before, I’ve not listed them in any particular order as they each have their merits. I did consider putting them in order, but on reflection it’s mostly down to aesthetics and price, but even the most expensive (the PiBow) isn’t that bad at £10-15. I did consider adding the Short Crust (which at £15-17 would be the most expensive) but I haven’t personally got one so can’t offer an opinion other than to say that it looks very nice and the re-location of the power port is a nice touch.
Please feel free to agree or disagree with my top 5 by leaving a comment below! If I’ve not covered your favourite case, feel free to leave a mini-review!

Boris Adryan wanted to introduce his children to Minecraft programming but felt that they weren’t yet ready to use Python. They were used to the visual programming environment of Scratch, however, and so the visual environment of NodeRED seemed like an appropriate next step. As a bit of a NodeRED buff, Boris decided that was the way to go and has written a piece of Python which accepts messages coming from NodeRED and translates them into the Python Minecraft API. There is still some way to go (like creating blocks, and that kind of thing), but the fundamentals are there. This is a great way to fuse the two languages together and I urge you to give it a go. Read about Boris’ work here.

This isn’t the first time I’ve featured a tutorial on setting up a wireless access point, but it’s such a useful thing to be able to do that I have no qualms about covering it again. This time, it’s a new tutorial from Liam Fraser of Linux User and Developer magazine. It’s concise and comprehensive and well worth taking a look, especially for those people who do robotics and want a standalone Pi to connect with their phone as a control device. Read it here.